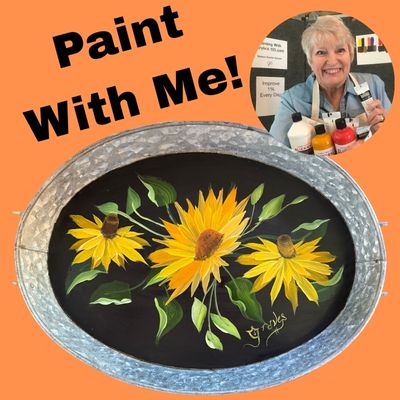
Galvanized & Glorious: Painting Sunflowers with Depth and Drama
Ready to add a little sunshine to your décor? In my latest video, Paint With Me: Sunflowers on a Galvanized Tray, we’re taking a thrifted rustic metal surface and transforming it into a cheerful, dimensional piece of art—perfect for gifting, displaying, or just brightening up your space. It truly is galvanized and glorious.
We start by painting the entire inside surface of the galvanized tray black, which might sound bold—but trust me, it makes those golden petals and rich green leaves pop! The black base acts like a deep shadow that brings forward every brushstroke of color. Hence the glorious part.
Next up: the leaves. Instead of flat green blobs, we build our leaves in layers of value. Using lighter and darker tones, I show you how to create the illusion of depth and form. Want your leaves to curl and twist a bit? It’s all in the brush pressure and the way you flip the stroke—literally! I walk through how to paint both the front and back of the leaf, which gives your painting more realism and energy.
The stems and leaves are in the first half of the video. It’s important to use several values for the stems and the leaves as well as the petals to create the depth you’re looking for.
Then come the stars of the show: three beautiful sunflowers, each with its own personality. One of my favorites is the angled flower in the center. It’s not straight-on—which adds interest and gives you the chance to play with foreshortening. The front petals are shorter, while the back petals stretch longer, helping to build believable layers.
To get those lush, realistic petals, we use different shades of yellow and pay attention to the length and placement of each layer. Just like in nature, no two petals are exactly the same, and that’s where the charm lives!
This project is beginner-friendly but gives you lots of room to explore brush control, color mixing, and composition. And the best part? You’re left with a functional piece of art that’s just as joyful as it is useful.
I finished the tray off by adding several layers of glossy or medium gloss varnish I brush on, Personally, I’m not a fan of spray on varnish, but that’s just me. I’m adding black and white checked ribbon to hang the tray, The tray could easily be a display piece by hanging or use as a tray. Three layers of a food grade varnish would be advisable for that.
Get your paints out, watch the video again and get started.
Make sure you never miss a single beginner painting lesson by signing up for my weekly one-page newsletter HERE. (I never spam you cause I hate that.)
Thanks so much for being here today,
Sharon Durbin Graves
P.S. I love painting on thrifted items so of course you could use this lesson on many other surfaces you find or like better than this galvanized tray.
P.S.S. Here’s another FREE class you can take.

