Why Your Paintings Look Flat
Ever wonder why your paintings look flat? There is one fundamental beginners miss. I’ve taught hundreds of beginners in group and individual classes and one of the things beginners do that makes their paintings look flat is overworking their painting.
What Does Overworking Mean?
Overworking is when the painter continues to put paint in the same place over and over again.
Why Is This a Problem?
When you repeatedly go over one thing more than 2 or 3 times, you are actually mixing paint on the canvas and the more you mix the paint the flatter it looks. Watch the video to see how it works and what to do instead.
What Is The Solution?
The solution is a difficult thing for most beginners and that is to lay down a stroke and let it go. I know how hard that it is, but resisting the urge to continually go over and over an area will improve your art.
In the video there are examples of:
- Over mixing or over blending
- What happens when you over blend
- How to fix that problem
If you’ve painted several paintings, I’d like you to pull them out and look at them closely. Look at your main center of focus. Go all around it slowly looking to see if it’s flat or does it have dimension. A flat painting cannot have depth or life.
Now look all over the painting to see if there are other areas that look flat an using the information you gained through the video, consider how you can improve your painting.
One Thing I Learned After Painting For 25 Years.
It’s OK to paint on an old painting. In fact I have learned a lot by doing just that. As you improve over time, you will see things in old paintings that you know you can improve. Go ahead! You have my permission to paint over it. I don’t mean put a whole new background on and start over, although I’ve done that many times. What I’m talking about is improving a section of the painting that you know what is wrong with it and how to improve it.
Let’s say you painted a barn and now that you look at it with more learned eyes, you realize that it is very flat looking. You also know that you didn’t decide where the light was coming from and now you know its location. You also know, after watching the video that the side where the light is coming from is lighter and the opposite side is darker. You know that there are slight shadows under window sills, door frames and eaves. 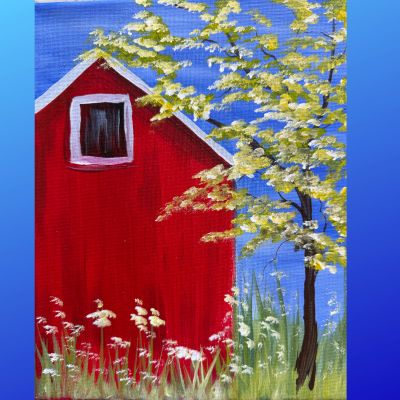
Several things give this barn life. Look at the shadow under that right eave. Also the siding on the barn isn’t actually painted like siding but you know it is siding because of the variations in the red color. It takes very light pressure and very little paint to achieve the look but it is absolutely doable for a beginner.
Now look at the leaves on the tree, the grasses and the flowers. They are not one color. Every item in your painting needs a minimum of three values for it to have depth. Notice the various shades of green on the leaves. The light is coming from the left and the leaves on the left side of the tree are lighter.
The background grasses are darker and as they come forward they get lighter and warmer. Those are fundamental concepts you will use in all your artwork.
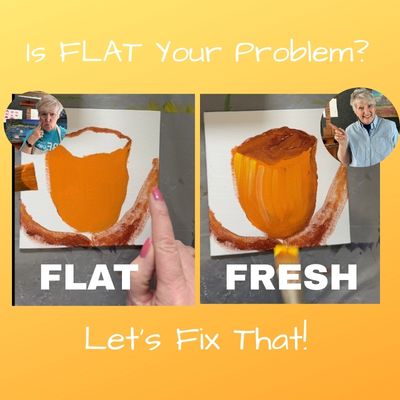
Back To The Tulips
 The tulip on the left was over worked as I showed in the video above. I had several colors of paint on my brush but because I kept going over and over the bell of the tulip it all mixed together and went very fat.
In the tulip on the right I pinch wiped my brush and added some yellow to what was on my brush and very lightly pulled the paint down one time and moved to the next spot and repeated that. As I went across the tulip my brush picked up the darker paint below and got darker as I went from left to right. I also added a slight shadow on the far right of the tulip where the light from the left didn’t reach. With just that minor adjustment you can see the difference it made.
Why your painting looks flat is just that simple to fix. In the video you learn even more on how to give that tulip life, interest and more depth. Click HERE if you haven’t watched the video yet.
Your Homework
You didn’t think you were going to get off without homework did you? I’m a teacher so of course I’m giving homework. Look at some of your oldest paintings and notice areas where they look flat and using the principles taught in the video and this blog post, map out in your head how you can improve them. Then get out the paints and brushes and learn things about creating depth and perspective on your old paintings. It’s better to learn on them than to have them stacked in a closet.
I hope this helps you as you go forward in your art journey. I know it would have shortened my learning curve 25 years ago.
Let’s paint together soon,
Sharon
P.S. Get the 5 Secrets Every Artist Should Know HERE. You are the reason I created this eBook to help you improve your art faster. Download it and print it out and keep it near where you paint to refer to often. I still look at notes I took in the very first art class I took over 20 years ago. Enjoy!