Springtime on Canvas – Simple Floral Painting Techniques
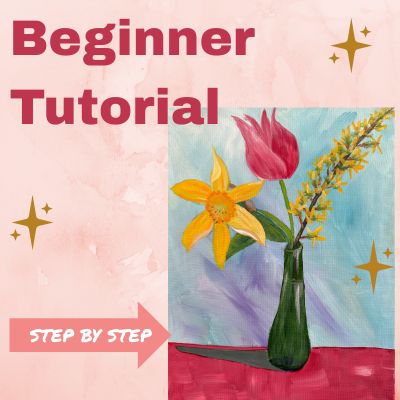
There’s something magical about bringing springtime to life on canvas—especially when it involves vibrant florals and a touch of vintage charm. In this week’s video tutorial, I’ll walk you through step by step painting a delicate spring bouquet featuring a soft pink tulip, a cheerful yellow daffodil, and a graceful branch of forsythia—all gathered in a beautifully translucent antique green glass vase.
These simple floral painting techniques are perfect for beginners and more experienced painters alike. You’ll learn how to choose a harmonious color palette, mix your own shades to get the subtle hues just right, and build the painting layer by layer for depth and realism. The gentle curves of the tulip, the trumpet shape of the daffodil (which I have felt are hard to get), and the tiny blossoms of forsythia offer a chance to practice a variety of floral forms—without feeling overwhelming. (See my paint palette below.)
Make sure you never miss a single beginner painting lesson by signing up for my weekly one-page newsletter HERE.
One of the highlights of this lesson is the glass vase. Painting glass can feel intimidating, but I’ll show you how simple brush pressure, thoughtful layering, and a few highlights in the right places can create the illusion of transparency and water. You’ll also learn how reflections and background color impact the look of the glass—so you can adjust your painting to suit your style.
We’ll talk brushes, too! You’ll see exactly which brushes I use for petals, branches, and fine details—plus how to hold and move them to get natural shapes and textures. From soft synthetic flats to fine liners, knowing which tool to grab makes a big difference.
As always, we’re working in layers—starting light and loose, then gradually building value and detail. This gives you freedom to make adjustments as you go, and it keeps the process from feeling rushed or too precious. If you’re painting along, remember to step back from your canvas now and then. That little pause helps you see the whole composition and decide what needs adjusting.
So grab your paints and let’s welcome spring together. This bouquet is more than a painting—it’s a little celebration of the season, a practice in patience, and a chance to create something beautiful, one brushstroke at a time.
👉 Watch the full tutorial now and paint your own spring bouquet!
🎨 Don’t forget to tag me if you share your painting—I’d love to see your version!
Paints On My Palette
- Titanium White
- Cadmium yellow medium
- Cad orange med
- Cad red med
- Hookers green
- Burnt sienna
- Burnt Umber
- Ultramarine blue
- Dioxazine purple
- Turquoise deep
- Lime green
- Alizarin crimson
Brushes
- Synthetic flats 8 & 6 & 2
- Script liner
Canvas
14″ x 11″ stretched canvas
Feel free to use any size canvas or other support, any colors that work for you and whatever brushes you’re comfortable with. I’m teaching a method, but I don’t want to dictate what you paint with. I am just showing you what I used.
I know this is a long video, but it is a step by step tutorial of a full painting.
Make sure you never miss a single beginner painting lesson by signing up for my weekly one-page newsletter HERE.